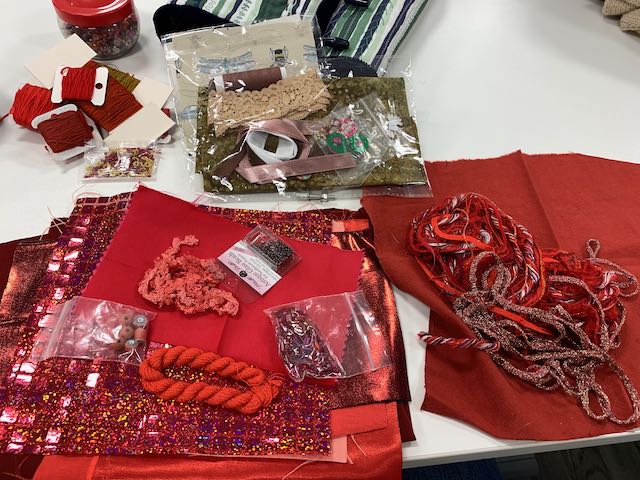
This week at “In the stitch zone” we started a new project, an Upcycled Mandala Brooch. As usual I was grabbing bits of fabric, threads and notions of various types in the last minutes before leaving home, and I ended up with three inspiration type packs, still leaving me with far too much choice and stuff, but not sure what I was really wanting to do.
Alex showed us a few examples and made suggestions of shape and size, and mentioned that they could be attached to a couple of different types of brooch backs, a hair slide or bobble.
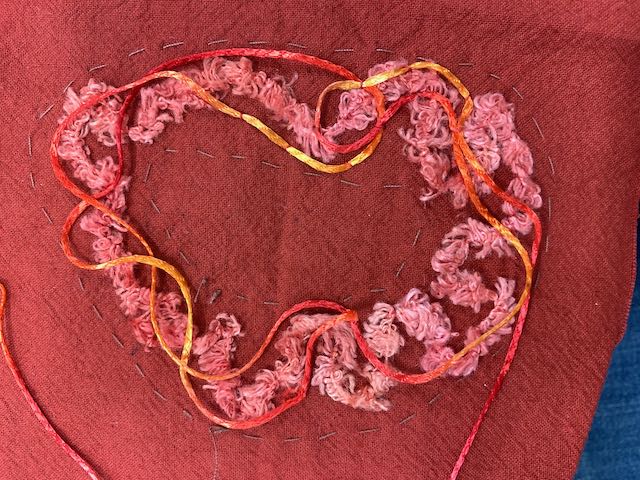
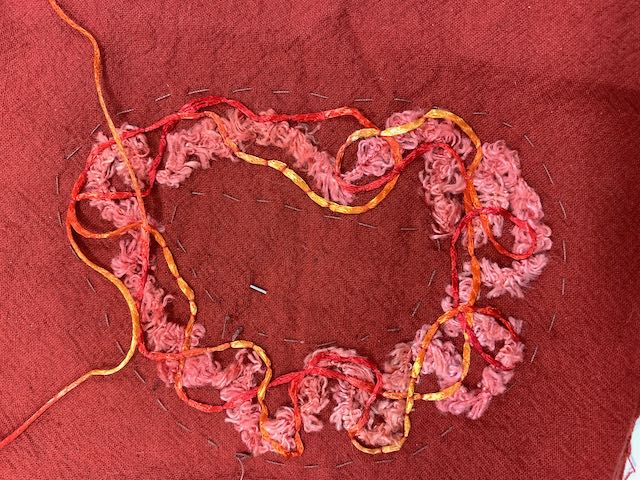
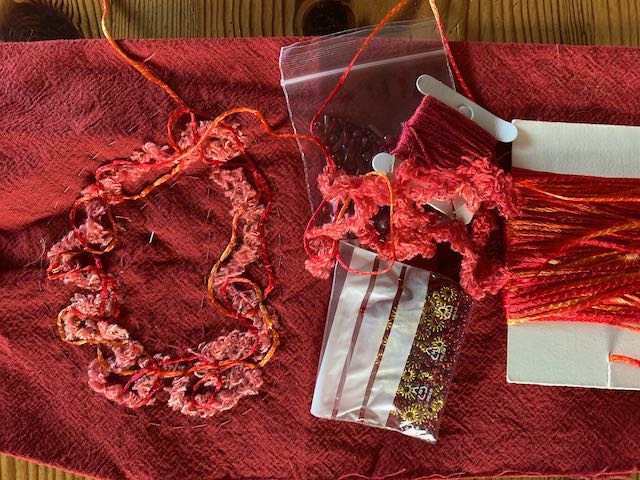
I settled on a rusty red piece of dyed(?) calico out of the red pack, and then decided I didn’t really want another brooch, but a hair slide similar to my felted one would be useful. I then went off piste even more with an irregular shape. The tacking lines are the outline of the finished slide (it has a straight piece that goes under my hair in the middle section). The fluffy yarn was only suitable to couch with, but gives a nice texture. The variegated ribbony yarn was best couched with the closely woven calico too.
By the end of the session I had almost couched it all down. The under-and-overs remind me of Celtic knotwork, easier to manipulate than draw!
I had got some beads and other bits with me in the red pack, but think the little gold ones mght get caught up in my unruly curls. Alex had asked what we thought about having another week on this project, as a few folk hadn’t been able to come, and the project for the following two weeks will only take a week to do. We all agreed this was a good idea, and it also means I can find other bits to add when I have a better look in my stash now I know what I’m aiming for.
Yesterday at Lincolnshire Textiles we had “Creative Corners”, a series of in-house mini-workshops. Five members had all volunteered to share a skill with other members of the group. Predictably, I wanted to do them all, but we could only choose two, one for the morning session and one for the afternoon. The one I signed up for first was only in the morning and limited to eight people: “How to dye/die with shaving foam” (sic) with Clare Lee. My name was first on the list!
Lorna had shown us how to marble on canvas with shaving foam at the Market Rasen group some time ago, but I had missed the session, along with a few other people. So, earlier in the year she had done another session for the ones that had missed it and the members who were new to the group. I’d had great fun, so was keen to have another go.
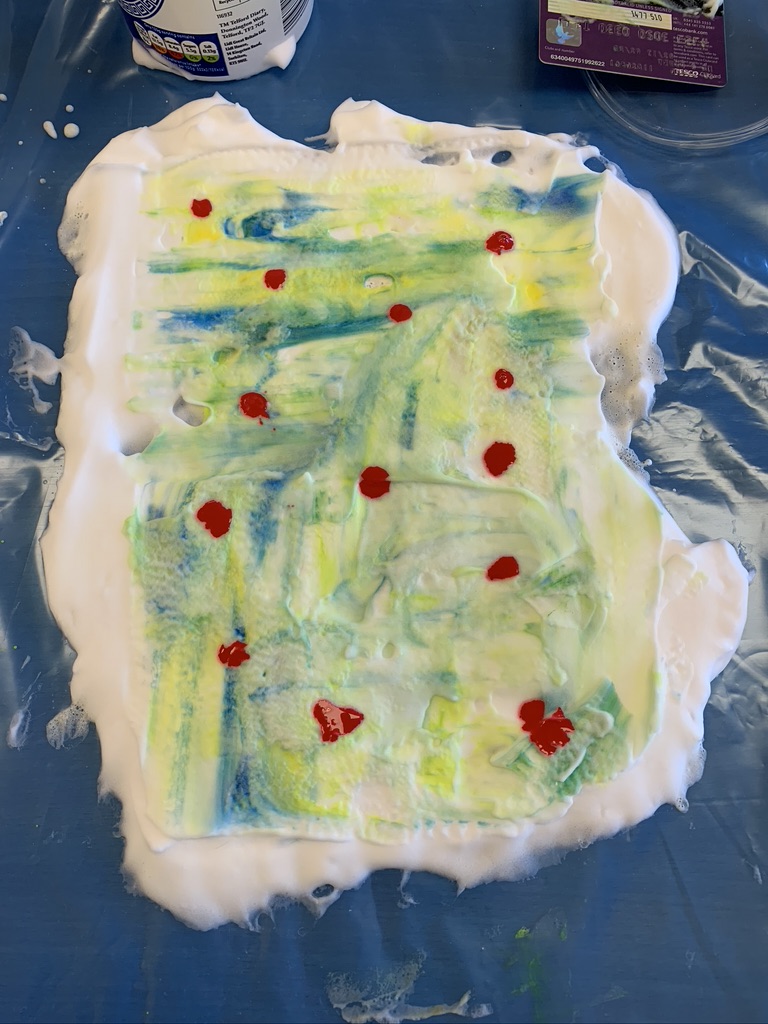
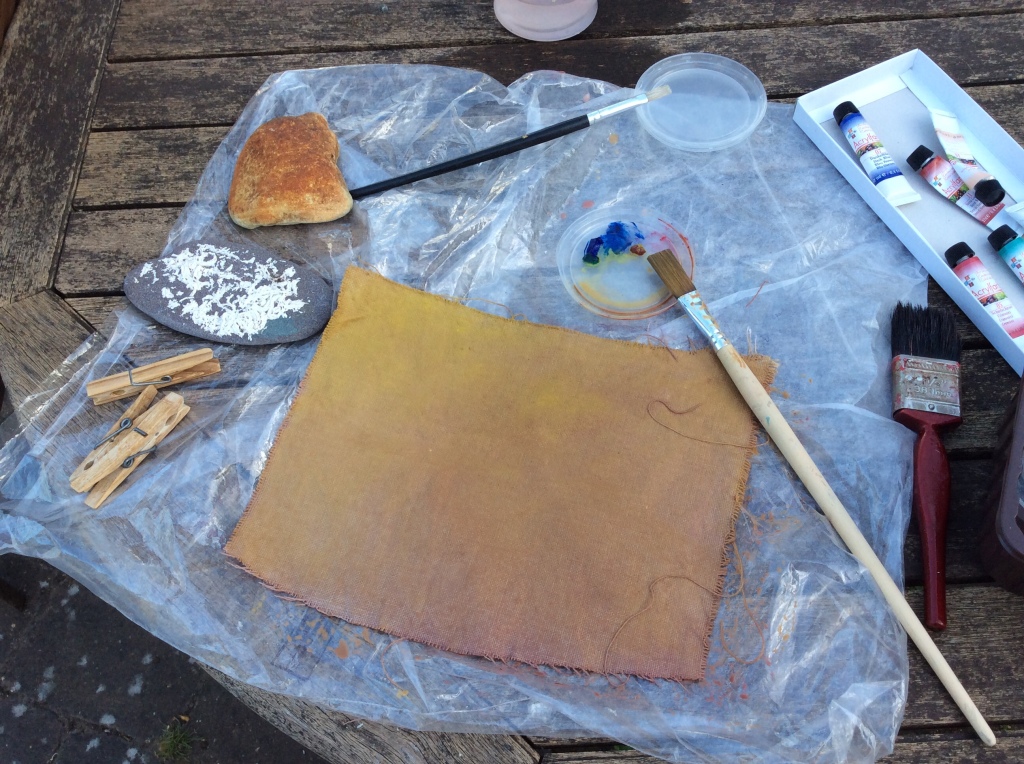
Clare’s approach was a little different. We put the shaving foam directly on to the table rather than a cat litter tray (there was plastic sheeting taped down to the table when we arrived). This means that you are not limited on size, although it was suggested that we used fabric cut to approximately A4 size. Also we used acrylic inks rather than acrylic paint.
Clare gave us a demonstration to begin with: how to apply the shaving foam to the table, spread it out and add the ink, swirl it around, lay the fabric on top, gently rub in both directions, carefully lift off the fabric, (and use an old credit-card to scrape off the excess foam, putting it into a plastic tub to re-use later on another piece of fabric, which works really well to stitch into).
I was eager to get started, having seen that the ink was more controllable than I’d realised. However, it’s still a surprise each time you lift off the fabric. I started with a sunflower in mind, and used a dull yellowy cotton fabric, brown ink in the centre and yellow petal shapes on the shaving foam. In hindsight, I should have added some green.
I then used the remaining foam on a white piece of fabric, but this wasn’t very interesting.
I added some blue and green to the shaving foam, and tried it on a dark brown fabric.
What was scraped off was added to the yellow and brown piece from above; this was much more interesting.
This was left on the foam, which I smoothed out…….
…… added some red dots of ink…….
……. and using a kebab skewer pulled the red out from the centre in petal shapes.
Clare gave us another demo at this point: how to do allium type flowers and a wave-like curve. I was really excited by this, as I tried (not very successfully) to take some photos of crashing waves in Cornwall back in 2008. I still have the image in my head, and I thought this may be the way to capture it.
I continued with the petals, but the red had sunk into the foam and wouldn’t pull out in the same way, so gave me different shape petals (the ones on the left). However, leaving it for a few minutes before use didn’t affect the print quality. The right-hand side is the scrapings applied to the rest of the fabric. It looked very Monet with the first layer, but I unfortunately added more.
We were rapidly running out of time by now but I wanted to have a go at the wave effect. It was rather rushed but gave me the general idea. I’ve also used the scapings over the top. It’s certainly something to have another go at.
It was a really good session. Thank you, Clare. Also thanks to Brenda Scarman, for organising “Creative Corners”. I’m eagerly looking forward to the next one at the February meeting.
In January 2019 I went to a Lincoln Embroiderers Guild (now Lincolnshire Textiles) workshop to make a beaded collar with Anthea Godfrey.
We had a requirements list, which included feature beads, and ready-strung beads to dye. Once we had dyed the beads they had to dry, so we used a pattern to lay out and arrange the feature beads while we were waiting.
We had stated what colour we wanted in advance, and Anthea had dyed and prepared the cording on calico stretched on to a frame so we could get straight on with the beading, and I had asked for moss green / olive. I tend to wear either V or polo necks, and realised before we started attaching the beads that I would wear it much more if it had some interest coming down at the front, so I added some more cording down the centre front.
Then I started beading the centre piece. This is as far as I got on the day (not the felt or the buttons) and I haven’t touched it since.
The time has come to continue with it, but on looking at it again I decided it would be easier to stitch the beads on to pieces of felt. I used the buttons to check what size felt circles I would need, and how many to use. Up-close or gaps in-between? Once I’d put buttons touching each other, I found that one side was 11 buttons and the other side 11 plus a half. The centre piece wasn’t central! Is this why I hadn’t continued with it at the time after the class? I’ve cut enough felt circles for them to touch, but may not use them all.
Then I started playing around with the arrangement of the feature beads, discarding a few of the original ones for the moment. I also decided I wasn’t happy with the attachment of the beads stitched on so far. The smaller row down each side looks very uneven and wobbly. The bigger beads in the middle move around too much, and the big one at the top has a chip on one side; if it was there originally I thought it would stay hidden at the bottom, but it spins.
The beads have all been taken off, and I am in the process of stitching down the cord centrally. The water soluble pen shaped line is where it was, the blue line on the left is where the side appeared to be when it was centred when trying to work it out over the beads, and the fainter green line is where it really needs to go. I could have carried on, but think it would have annoyed me when I finally got to wear it. It probably could have been centred when worn, but the fastening bead at the back would be off to the side, and I’m likely to wear it with my hair up so it would be noticeable from behind.
Not only does it look as if no progress has been made, but it’s gone backwards! However, I feel that I will be much happier with the finished piece having corrected it at this stage.
I have made the most of the kitchen table being clear for a few hours today, it probably won’t be again until at least next Tuesday. Miles and Lera are coming back later for New Year and staying until then.
I have finally plucked up the courage to cut out the lining for the beautiful Sari fabric dress that I wrote about back in mid-November (“Dress-making”), using a “Vogue” pattern. It’s a princess line, the front and back each made of four panels. Having discussed the best way to tackle it with a dress-making friend, it was suggested that I use the lining as a toile, and make any necessary alterations before I cut the Sari fabric.
The pattern pieces were all out and ready to go, but Christmas preparations and other things got in the way. There were no more reasons (excuses?) to procrastinate about it this morning, so I ironed the dyed fabric and the pattern, and set to.
The usual practice, measure twice and cut once. I kept checking the straight grain, and making sure it was all going to fit. There were only four pieces, needing two of each, but it had to be done 2 x 2, as it wouldn’t all fit on the table in one go. I had a final consultation by phone, to check and confirm where I was adding a fraction to make sure it fits on the waist (which seams).
I was all ready to pick up the scissors, having discussed whether to use pins or weights to hold the pattern down, and scissors or the rotary cutter. I chose to stick with what I know – pins and scissors. Carefully checking which lines to cut on the multi-size pattern as I went, I got half-way round the last piece and….. it wasn’t so obvious, but something didn’t make sense!
Instead of it saying, 6, 8, 10, 12, and 14, it said 16, 18, 20 and 22; odd! All the pattern pieces that I didn’t need were put back in the envelope when we were taking measurements. Also when the friend came to talk through the best way to tackle it, we had taken measurements on all four pieces to check my calculations on bust, waist and hips, and to allow for ease: all fine.
How all three of us (me, at least twice) had missed that one piece was from the other size pattern is beyond me, but fortunately I had started at the shoulder seam and then cut down the centre back. I’d already left the excess on the other three pieces at the hem, just in case we decided to make it longer and, as I was checking which line I wanted, I noticed the larger sizes printed on the pattern.
Very lucky, I quickly swapped the pattern pieces, lined up my notches on the centre back and re-cut round the neck and across the shoulder. The photo below shows how much more I needed to cut off.
If I hadn’t noticed, I would have been wondering why things didn’t match up. It was all cut out and ready to stitch now. Once I got going, it all felt very natural; like riding a bike, it soon comes back. Hopefully the stitching will be the same.
It’s a “Very Easy Vogue” pattern, so if it lives up to its claim, it shouldn’t be too difficult. But if memory serves me well, I used to find Vogue patterns unnecessarily complicated. Time will tell.
This week I have had three workshops, firstly a silk paper making one at Lincolnshire Textiles. It is something I’ve done before many years ago, but I’ve gleaned a few useful tips: it works just as well or better with diluted PVA glue, and to lay the silk tops very finely on the net, that fresh leaves and flowers can be used (this certainly probably works better with the PVA), and that you can decorate both sides of the paper by folding the net over the worked piece and turning it over and carefully lifting the net back to add decoration to the back. Also, I have finally found a use for Throwster’s waste!
Back
I had a last minute scavange round the garden before I left home, picking little leaves and petals that are just begin to change colour. The bag of Throwster’s waste on our table picked up the colours in the vegetation. Ironically, wearing a mask was helpful as you couldn’t blow the fine silk tops around. We were also warned to move slowly and calmly so that we didn’t waft our own or anybody elses work around. The photos were taken a couple of days later when they were completely dry. I must admit that I’m surprised how little the colours of the leaves and petals have changed.
FrontBack
The second session was with Kate Brown, who is coming to SEATA (Scunthorpe Embroidery and Textile Association) to do a printing workshop with us all next week. Sandra and I had the privelege of being guinea pigs earlier in the week. It was great fun, masses of work done in a couple of hours. I’ve always thought it was a bit messy and clatty to do at home, but Kate has proved to me otherwise.
We started off printing on A4 photocopy paper, so nothing expensive and precious, using Essdee Fabric Block Printing Ink, rollering it on to acetate sheets and mark-making into it, before laying the paper on to it. Each rollering gave us two or three prints that gradually got lighter. We started with black, then did some coloured ones with two or three colours and finally a couple of white ones. Once they were dry we painted over them with diluted Brusho.
We also did a couple of prints on fabric, one of which I was pretty pleased with and will probably stitch into some time. I don’t think I’ll manage to get it done before the workshop, but may manage to make a start.
And, finally a dyeing day with the Grasby Embroiderers group. This was today, so everything is still waiting to be washed out and dried. We used Procion dyes from a sadly missed former member who died a couple of moths ago: Maureen would have enjoyed the day and been pleased with the results we achieved. I started off using different colours, but this tray reverted back to my comfort zone palette, in spite of adding some purple.
Over the last few weeks I have been playing around with colour in various ways. Dyeing and painting fabric and paper with different media.
I started with painting some linen with acrylic paint for the ‘Beach in a box’ containers for the Debbie Lyddon workshop I did a few weeks ago.
A beautiful afternoon so I decided to paint outside. I didn’t want the fabric to be too stiff to stitch, but apparently the paint helps to stop it fraying. So a bit of a balance between the paint and the fabric. (It does seem to work pretty well). I wet the fabric first, to try and help keep it soft enough to stitch, still only beginning to stitch at that stage. Then mixed red and blue to try to get a colour that would tone with the grey stone. Added more watered paint in each colour directly on the fabric to get the right hue.
Red and blue
Then started the rusty coloured piece, bit more tricky to get the right colour. Started with the red, yellow and blue, a bit of peach and a bit of green, mixing as I went, then adding more of single colours directly to the wet fabric until I got it right. I didn’t want to match the stones and shell exactly, but wanted something that toned with them.
The three primaries – red, yellow and blue, peach, burnt sienna and green
This time to go with the shell, more obvious colours in it than the stones. I used the same tubes of paint as I wanted them to harmonise with one another, as well as pick out the object colours.
Again the same colours to mix with I do like the palette – sad but true
I’d got some paint left over, and the paint on the plastic bag I was working on, so not to waste it I painted a few more bits of the linen.
Waste not, want notHung out to dry
I’ve only started to stitch one so far. The idea is for each container to have a grommet in, which in effect is a little window to peek at what is inside. I have used strands from the unpainted linen to stitch the grommet with and will do the other two grommets in the same way. I want the surface stitching to echo the surface texture of the treasure inside. I realised after starting that I should have done the plain one first and made it up to solve any issues with it before spending time on the surface stitching. The perfect reason / excuse for starting the other one. The surface stitching will take a while on the greyish one, and longer for the shell.
Painted fabric with stones and shell
I was filling up the turmeric jar last week and a bit got spilt, so I mopped it up with a bit of cotton fabric, knowing how it stains if you spill anything with turmeric in down your front. Lovely bright yellow, so washed the empty bag out into a large yogurt pot and added the fabric and left over night. A beautiful sunny yellow.
Turmeric powder.
I’m not sure what I’ll use the fabric for yet, but several photos I’ve taken in the last few weeks are this colour. Seems I need a fix of sunshine at the moment.
Water irises at a local wood.Dandelion when out on a walkTulip in the garden
Amaryllis, strange fruit, close-upFrom ‘Singing Jazz’, Bruce Crowther and Mike Pinfold, 1997
I first heard this song in the mid 70’s when I saw the film ‘Lady sings the blues’ with Diana Ross playing Billie Holiday. The first few bars still make my skin scrawl. As a child I was pretty sheltered, going to a secondary school where there were two half-caste kids in my year of 200-ish pupils. I don’t recall any other coloured kids in the whole school of more than a 1000, this on the outskirts of Birmingham!
Unconsciously sheltered, I was shocked and horrified to discover that the colour of a person’s skin could affect how they were treated. The death of George Floyd on 25 May 2020 in Minneapolis, and the violence and rioting since make me wonder how little we have progressed since the poem was written in 1937 and later set to music for Billie Holiday.
The photo of the dying amaryllis, taken several weeks ago, made me think of the bodies hanging from the poplar tree, particularly when they started dripping thickish, red liquid that looked like blood. It made me wonder if it would dye fabric. I had some small pieces of fine, white cotton sheeting, dampened it and wrapped the flowers with it, putting elastic bands to hold them in place, to see what would happen. Some of them dried out very quickly, and were still white, so I re-wet them and left them all for a few more days. When I unwrapped them, they did rather look as if they had mopped up spilt blood. Whether it has stained or dyed the fabric I don’t know, I don’t want to wet or wash it to find that it disappears, which it could do over time in the light. The stem started to thin and collapse like a body after a blow, but was filled with liquid, which appeared rather like plasma. I didn’t want to burst it as I thought that it would nourish the bulb; this is the third or fourth time it has flowered over as many years.
Dyed / stained fabric; fluid filled stems
In 2015 I started a piece of artwork called ‘Open your eyes’, a response to bullying and intimidation, from words going round and round in my head in the middle of the night, and keeping me awake over several months until I wrote them down.
Words written down in the middle of the night
It came about by accident when a phrase ‘I can take anything as long as it’s not violence’ by Perez Hilton was spotted on a piece of Observer newsprint that I had used to keep the table clean while I was painting a piece of pelmet Vilene for another piece on a rose window.
Quote, close-up of paint marks; Scanned, enlarged piece; ‘Painted’ newsprint from Observer
Some of the words I’d written down were free-motion machine embroidered on calico with red thread, with the ends left hanging to represent blood running down. The piece of newsprint was scanned and enlarged, flaps were cut where the stonework template had left marks on the original newsprint, partly obscuring the words underneath. I then realised these looked like eyelids, hence the ‘Open your eyes’ title.
Free-motion machine embroidery; ‘Eyelids’ cut in paper, part obscuring text
We all need to open our eyes to what is going on in the world concerning injustice to our fellow human beings, whether that be caused by race, colour, religion, sexuality, gender, poverty, age…..
A busy few weeks, but all the same I was surprised to realise it’s four weeks since I last blogged.
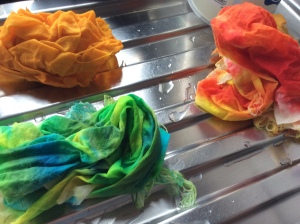
One of the fun things I’ve done was a procion dyeing workshop. I had done a little before, but it was much more hit and miss than this.
We all started with two colours and did a gradual run from one to the other (9 pieces). I picked Turquoise and Golden Yellow, knowing I would get some useful greens. We used 10 inch squares of calico and each piece was put in a plastic bag and left for 24 hours.
We had two reds, two blues and two yellows to choose from, a warm and a cool one of each. For the next batch I did equal quantities of two primary colours. So deep oranges, purples and greens, four of each in various shades.
The next few were playing around splashing reds and yellows on one piece, and blues and yellows on the other.
I ended up leaving them 36 hours as I wanted to wash them out in daylight to see the colours better as they emerged from the murky water.
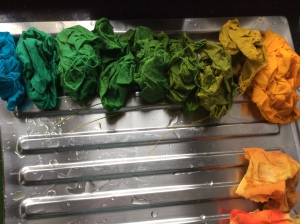
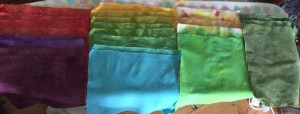
This is the gradual run from Turquoise to Golden Yellow washed out and still wet. I had expected them to be more mossy shades, but was happy with the results.
The middle greens were Lemon Yellow and increasing amounts of black to give more khaki shades of green. The oranges and purples show the variations with the cool and warm mixes of the blue and red, and yellow and red.
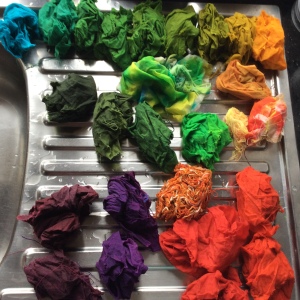
The whole stash drying out. I also did a few threads just to experiment.
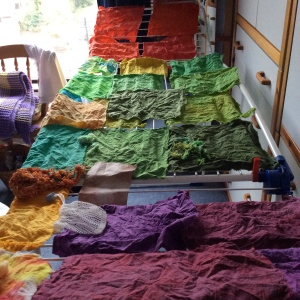
The whole lot ironed and sorted in to batches. Each fabric was labelled with a laundry marker and the proportions noted so the shades are re-produceable.
It was a systematic approach which I have not been disciplined enough to do before, but simple to follow. I will certainly use it again, but its also fun to have some happy accidents that are one-offs.
I’ve not used any of them yet, I’m still just admiring them.