I had an incentive for finishing off one piece this week, a friend’s birthday. A purr-fect present for her. She loves cats, and I really don’t. I used to wake up screaming when I could barely talk, sure that there was a cat coming in the window or in the wardrobe. As far I my mum was aware, nothing had ever happened to cause these scares, but even now occasionally I still have nightmares about cats.
I’m no longer frightened of them, but still the thought of one brushing round my legs makes the hairs on the back of my neck stand on end.
So when looking through my basket of half-done projects in plastic wallets with Sally several weeks ago, her suggestion of finishing the pink and purple cat for Elaine’s birthday was a good one.
It was a project that Eilleen started us on at Market Rasen group when Lorna was on holiday in July 2018. Her inspiration came from a card she’d been sent, which she interpreted to stitch on felt. Eilleen’s stage-by-stage sample below showed how we could produce our own versions, and we were all given prepared backing fabric and felt to use.
I haven’t got a photo of mine in progress, but had over-stitched the felt down, and done the features on the face before it had been abandoned in the plastic wallet. It did have a flower like the orange and green one above, but Colin made rude comments of how it looked so I ended up replacing it with another star. It didn’t need much to finish off, yet another project that only needed a bit more work.
Then it was laced around a piece of mount board and put in the frame. I realised I’d not signed it, so managed to stitch my initials in pink thread on his tummy.
I’ve also laced my sorbello stitch piece on to mount board. My intention then had been to cut a piece of mount board to go around it, but once it was laced I realised it would look better on top of the mount. I carefully made tiny holes in the back board, lined up the mounted piece in the right position and put the bradall through the laced board. Then I stitched through in a blue / grey perle thread and made sure the tiny stitches were hidden in the chunky texture thread. It isn’t a technique I’ve used before, but it all feels very secure and lies flat against the mount.
I tried it at the front and at the back of the box frame, and it looked better at the back. There’s no glass, as it detracts from the texture of the work, so being set back will also keep it cleaner for longer. It will always make me think of last week’s trip to Withernsea and the wind turbines in the haze when I look at it. It’s good when pieces evolve, as you work along and are influenced by things you see.
In October 2018 at what was Lincoln Embroiderers Guild, now Lincolnshire Textiles, we had an in-house workshop on Sorbello stitch, a stitch completely new to me, but once you’ve got the hang of it, pretty easy. It’s almost a twisted X-stitch, but can be done so it looks open or closed, regular little squares, squashed or elongated depending on how you place the stitches and where you bring your needle up and take it down. The idea was to use different size stitches in textured yarns and threads, in various thicknesses, to see how they affected the appearance of the stitch.
We were given a piece of fairly open weave fabric to work on, which needed to be in a hoop or on a frame. There were loads of threads to choose from too, some easier to stitch with than others: the stiff ribbons didn’t want to bend and gave a much boxier effect than the soft knitted ribbony yarns.
I’m not sure if the top photo is how I left it at the end of the day, or whether I’ve done some more to it since. I think the outline blue square was added at a later date. But this is how it was in the plastic project wallet in my basket of UFOs, the things that Anne Brooke called PHDs, which I like, and I also call WIPs: “Project Half Done” or “Work in Progress” sounds so much more positive than (yet another) “UnFinished Object”, reminding me that it really is a work in progress rather than an abandoned one. The threads below were also in the wallet.
It all looks a little puckered and loose, but I had released it from the hoop, or more likely ‘borrowed’ the hoop for something else. However, I am trying to take things out of the hoop at the end of each stitching session, to minimise marks on the fabric. Really I prefer frames, but sometimes a hoop is all that is to hand, and is so much quicker to set up for small projects.
None of the threads with it were very thick, so I had a bit of a hunt for thicker ones, sorting and tidying as I went. it didn’t yield much, except a poly-cotton fabric (top left, below) that I used as a lining for a hand-painted and stitched waistcoat, that I made from a programme on the telly by Jan Beaney in the late 70’s or early 80’s. I tore it into strips about 1cm wide, but not so nice to stitch with like the boxy ribbon; however, the colour was just what I wanted. The turquoise yarn has also been around a long time.
Another search around turned up a really chunky blue that I used in an Icelantic sweater that I knitted while still at school. My friend, who was no knitter, borrowed the circular needle and the four needles for the sleeves once I’d finished mine. She couldn’t understand why the sleeves were different sizes…. she’d only used the small needles for the main part of the sleeve, rather than the cuff on the one!
This is what I’ve used around most of the edge of the square. It’s giving a really firm edge to the piece, a bit tricky getting into the corners, and a frame really would have been better than a hoop in this case. The stitches are building up where they overlap, giving lots of texture. It has been quick to work, a nice contrast after the fine crazy patchwork piece of the last couple of months. It’s now ready for some lighter blues and whites, a little more sparkle of sun catching waves, just to finish it off before my palette changes along with the season.
This week I have been flitting about from one thing to another, my head all over the place with ideas for new projects. Have I finished all the old ones, the WIP, the UFOs, the PHDs? No, no and no.
But we did have an outside meeting of the Grasby group last week, and the current project for Grasby is finished. We have an Exhibition that has been the goal; there were a couple planned for last year which, of course, got cancelled / postponed. All being well, the Exhibition will go ahead later in the year at Epworth Old Rectory. Watch this space.
We have a new topic to start, and ideas have been buzzing around my head for several weeks now. I’ve not settled on anything yet, but ideas for other projects are coming too. Words, images, ideas come to me in the middle of the night, often going round and round in circles, loops or spirals stopping me from sleeping until I write them down. If I don’t write them down, they have often disappeared by the morning, sometimes to return in the middle of another night, but sometimes just lost.
Some of my best ideas come as I am in that half-awake state as I come to in the morning, and at the moment there is rarely a need for an alarm clock to disrupt these thoughts.
Processing these thoughts and ideas takes time, and mundane household tasks, like folding clean washing and putting it away, can help sort the chaotic jumping around from one thing to another in my head.
So there has been some curating of “la maison musée” going on this week. I came across a glass-lidded sectioned box I bought a couple of years ago in Topsham in Devon, when we were staying for a couple of nights at a hotel (The Globe) run by an old family friend and her husband. It was a lovely couple of days, good food, a beautiful place to stay with a warm and friendly welcome.
Box of curiosities (lid down)
The little town had some interesting little shops, including an antique shop and a couple of good charity shops. I can’t remember which the box came from, but it was too good a price to walk away from, in spite of having no idea what I would use it for or put in it.
It has finally found a home, on the lounge coffee table, which has been totally (cleared and) rehashed, starting with an old table-cloth that my mum bought in the 70s; it’s an orangey red linen, and the label has on it “Barker Textiles, made in Finland”. Mum would never have believed that her grandson would go to Finland to do his Master’s degree in European Forestry nearly fifty years later!
I have gathered various things together to fit the compartments, still seven to go. It was only after I got it home that I realised why it was so cheap: when the lid is down, part of all the edge sections are partly hidden. It isn’t such a problem on the sides, but the top and bottom are going to prove more of a challenge to find things that look right.
All that was in it when I came across it were the dried hydrangea petals, the purple and orange boxes with the glass “marbles” by Frances Beresford (I’m sure they have a proper name), and the yellow box with the Japanese Yubinuki thimble that I made with Rosemary Cousins. And very fiddly it was, too. The boxes had the lids underneath, and it made them all sit a bit low to see properly; sitting the lids on the bottom the wrong way up, and the box on top raised them up so they are more visible. This gave me the idea to stand some of the other things on empty cotton reels.
Skeleton of hydrangea petalDried hydrangea petal“Marble” by Francis BeresfordClose up of “marble”“Marble” by Francis BeresfordClose up of “marble”Japanese thimble
I came across various other things that would fit, the crochet sunflower that raised money for Lindsey Hospice when a friend died several years ago. Her daughters and some of their friends made several hundred of them, and we were all given sunflower seeds to plant at the funeral, something bright and cheerful to remind us all of her sunny personality.
Crochet sunflower
Colin’s mum was the Treasurer of Scunthorpe Canine Society for many years, alongside her job of chief tea-brewer and famous chocolate-cake maker.
Not sure who earned this medal in 1906 / 07 that was awarded for one year’s perfect school attendance by Lindsey County Council Education Committtee, but love the patina of it.
1906 / 07 award for attendanceLindsey County Council award
I also like the rusty dome below, not sure what it was, or where it came from, but I’ve stood it on a plastic cap, so it not going to damage anything else. Colin thinks it might have been a lid of some sort, it has what looks to be part of a hinge on one side, and part of a clip on the other. I just like the textures and patterns on it.
The little black cat on red felt he thinks had something to do with his dad, some sort of emblem on a cap, maybe. I’ve been frightened of cats since I was a baby and used to wake up screaming when I could barely talk, saying there was a black cat in the wardrobe or coming in through the window. So, I don’t generally have cat things around, but something about this appeals for some reason, maybe the stitching against the bright red.
This sparkly brooch of Colin’s mum’s is slightly damaged. The fastener is broken, and it’s not something I would wear anyway, but it fits nicely in the box.
Nanna’s brooch.
This little pyrography box was what Miles’ and our late black Labrador Truffle’s teeth were put in for the tooth fairy to find and exchange for cash!
Miles’ tooth fairy box
I think this little porcelain flower was my mum’s, as was the cotton lace little butterfly brooch.
Cotton lace butterfly brooch
This organza brooch was in my birthday box a few weeks ago, perfect colour with the tablecloth. The name badge at the top was one I did at Scunthorpe Embroiderers’ Guild several years ago. I went years without a name badge and we were challenged to do one at another group I went to around the same time, so I ended up with two, one green and one orange, so one or other goes with nearly everything I wear.
Organza brooch
The tortoises were also my mum’s. There are several others, but they don’t fit in the box. The way I’ve put them facing one another, I can fancy that they are having a conversation. Perhaps reminiscing about the things in the box, or discussing what else can go in the empty compartments!
There have been a few challenges this week. The first was to myself, to finish my green redwork, and I managed to finish stitching the last egg late last night. Well, the ‘shells’ were finished last week, so it was a case of ‘decorating’ them. Only one was finished (French knots), two were partly done (tiny seeding and cross stitches), and both were a challenge to find matching thread. That leaves two to finish and five whole ones to do.
It is a very different beast from what I would do now. I have learnt so much since I started it, but I didn’t want to unpick my earlier work. It’s interesting to see the progress I have made. Firstly the French knots and the cross stitches don’t show up well on the beige linen background, and unfortunately they are next to each other, so I couldn’t balance them across the piece. I didn’t want to do the others so light, to contrast better with the background, having used stronger, brighter greens.
I’ve added tiny triangles, basically three little running stitches, single chain stitches, lazy daisy flowers, bigger seeding and straight stitch ‘flowers’. The partly finished ones, I think I have matched the thread or pretty close. Note to self, do not take all the thread for another project! Or make a note of what it is, brand and number, and how many strands of thread were used!
Finished, apart from needing a wash and press.
I’ll wash and press it before I put it away with the Easter decorations. For now, it’s on the kitchen table with a broken-off branch of beech I picked up in the woods nearly two weeks ago. I put it in a little vase and kept it topped up with water. The buds are fattening nicely, and before they open much more I need to put the tiny painted wooden eggs on it.
Fattening beech budsThe vase sits just right in the centre of the eggs.
The Grasby Easter lockdown challenge #9 nearly didn’t get done. The Grasby group hopefully will have an exhibition this year, we were all working on it for last year, but of course it didn’t happen.
We had a deadline of the 31st March to finish our final piece, so I have been working away at that, which is now finished. Phew! Lots of experimentation and working out how I was going to execute it, but got there with a day or two to spare. The pieces we do for Grasby are not shown until they are exhibited, so watch this space for details. This took precedence over the lockdown challenge.
We had all had #9 in a pretty envelope which arrived towards the end of February, with a tiny fretwork egg on a mauve ribbon and the request to create something, anything on the theme of Easter – Pagan or Religious, using the colour of the ribbon. I opened it and read the instructions several times, but put it away not wanting to get side-tracked from my main piece. I had a few big ideas for the challenge, but not time to do them by the time the main piece was due.
But after last week’s painted ‘Fun-ky chickens’, and as I looked at the instructions yet again, it suddenly occurred that I could do a stitched ‘Fun-ky chicken’. I had the perfect little white plastic oval frame, nearly egg shaped, and the right size complimentary yellow piece of felt for the background. I couldn’t find the googly eyes that were my first thought (found them since!), but think the beads work better anyway: a handful of mauve and purple threads and I was off.
It was a quick piece, but at least I have managed to do all of the Grasby challenges. And Colin came up with the perfect title for it “Which came first?” (chicken or egg).
“Which came first?”
The lockdown challenges are all on Facebook under Grasby Embroiderers and some earlier work that has been exhibited too.
The final challenge(s) is one by a friend. Earlier in the week when the sun shone and it was warm and sunny, and we could finally meet up in gardens, I was showing Sally, a non-stitching friend, how she could make a patchwork cushion. I’d got out my quilt book, with photos of my work and how I’ve tackled some of my quilts. The first job (another one!) is to up-date it, photos need finding and printing, fabric samples and sketches, ideas gathering…… it is a useful resource and record of some of my work.
The second is to finish ‘my first quilt’. It was started in 1999, a memory quilt of an Easter visit to our dear late American friend Dottie in Tucson, Arizona. The sixteen patterned fabrics were chosen and bought in Michael’s, an art and craft hypermarket unlike anything we had in England at the time. A bigger, better Hobbycraft-style shop. Dottie’s niece Ginny took Miles and myself there, having dropped Colin at a ‘record shop’. We were there for literally hours, and I still felt I’d only scratched the surface of the place. I spent quite a lot too, but was sure Colin would have spent just as much or more in the record shop! I was not wrong.
We had nearly finished our shopping when I spotted a memory quilt hanging from the ceiling. I didn’t like quilts at this time, could see no point in cutting fabric into pieces and then stitching them back together! Most of what I had seen before this was a mish-mash of fabrics, hexagons hand-stitched together, and I was not impressed. But this memory quilt was done in beautiful, brightly patterned fabrics, carefully selected to make a coherent whole.
I was blown away by the idea of making one to commemorate our holiday of a life-time in America. We had fun choosing the fabrics to represent various aspects of the holiday; lots of Mexican food, including chillis, a trip to Old Tucson, Easter eggs, humming-birds, flowers, saguaro cacti, road signs, medical instruments (Dottie ended up in hospital for a couple of days with pneumonia while we were there), iguanas (we saw lots, and Ginny loved them), frogs to represent a friend of Dottie’s who also took us out for the day.
I bought eight plain brightly coloured fabrics to go with the patterns once we were home, and spent many hours playing with pieces of coloured paper working out which to put together, to make what I later found were traditional 9 square blocks. If only I’d known, I would have saved myself a lot of time. I even did triangles and have no idea how I worked out how to make them the right size to fit with the squares. Trial and error, probably.
I eventually finished the blocks and wanted sashing to represent the landscape, desert and saguaro cacti growing everywhere like we have trees here. So the sashing was a dull beige, with saguaros on the squares to make the intersections.
I then made one inch squares to make the lettering to say TUCSON at the top, and EASTER 1999 at the bottom, all paper-pieced together, with triangles to make the ‘R’s’.
I did blog about it long, long ago before the lettering was all stitched down, but I haven’t touched it since. Sally’s challenge to me is to finish it, having asked how long it would take me. But I’m not going to commit myself to the time scale!
‘My first quilt’ started in 1999.
I couldn’t get at it to show her, but have now managed to get it out. Now I need to find the fabric to do the saguaros on the corners.
Happy Easter to you all, green eggs have less calories than chocolate ones!
I’ve worked on the Jan Dowson piece this week and have now finished the stab-stitch. It’s still got raw edges on three sides, the other side has a nice firm selvedge which may stay as it is.
It now poses several decisions; which way up it should go and what am I going to do with it. The latter possibly affects the first. It could be a cushion, but my first real embroidery teacher Pat Philpott always told us not to have knots on the back of our cushions, as they were uncomfortable to lean on, and certainly would be on the front, same applies to beads and French knots. This always makes me think of ‘The princess and the pea’, but it does have several quite knobbly bits.
A bag, possibly, but it may not stand up to the washing it would need. The yellow would get grubby quite quickly. It could have a dark surround to the panel though, which would make the panel glow and pop like some of the autumnal trees around. There seems to be more yellow leaves this year, the weather conditions?
A sketchbook cover, maybe, but may spend more time stroking the cover than working in the book. It does feel nice, all the different textures under my fingers telling their own stories. Is it that I have become more aware of these things since social distancing, and it helps fill the gap of physical contact with other people?
When the paisley motifs are horizontal I keep seeing them as ‘whales’ and finding it impossible to un-see them as such. Some are being friendly facing towards each other, and some are turning their backs (tails – do whales have tails?) on each other! Think I’ve spent too much time in isolation and getting fanciful!
The flower looks as if it’s drooping in the centre ‘whale’.
It’s useful looking at photos of our work. It helps to highlight things you don’t necessarily spot as you are working, for instance I’d forgotten that I’d not finished the yellow straight stitches around the ‘tail of the whale’, I think the yellow perlé has been ‘borrowed’ for another project. Note to self, look on a ‘good’ light day as yellow is difficult to match on dull days or artificial light.
Just spotted that the bottom left ‘whale’ is not finished
I know we are living in a crazy world at the moment, but the flowers are still growing the right way up, not giving in to gravity and growing downwards as in the image below. Also in spite of assessing the balance of the whole piece as I was working it seems top heavy this way too.
The flower just looks upside down in this one
At least one decision sorted, the orientation; weight at the bottom, the flower growing upwards, paisley’s not whales, which also puts the selvedge on the right-hand side, so possibly / probably a sketchbook cover. Unless I have any other ideas!
The autumnal colours that are beginning to take over from the greens prompted me to pick up this silk shading stylised tulip that I started on a Nicola Hume workshop some time ago.
I’ve procrastinated about it on several occasions, partly my arm but mainly that I had ‘borrowed’ the threads for another project, no idea which, so finding the ‘right’ threads has put me off. I’ve even picked out more threads and done a little bit more on it; the centre above and below. Then when I came to continue again the threads have disappeared (into the black hole?) once more.
The centre finished
I’ve picked out more threads and determined to finish it, before the threads vanish once more, I’ve used two or three darker browns to stitch the stem.
Starting the stemFinished stem
I have cut away the excess fabric, laced it over a piece of mount board covered with a piece of white felt, and put it in the top of a tea box that I had sealed with Danish oil or Finishing oil months ago. It’s been ready and waiting for the embroidery to be finished.
Top of the tea box.
I’ve also worked on the Alison Larkin Hardanger infill sampler over the last couple of weeks. It only needed the last three blocks doing. Lots of challenges here; no in-person tutor, new infills, written instructions, scale of the work (‘new’ glasses are wonderful!), left for too long to even remember the basics, general procrastination about it. But classes aren’t going to be starting any time soon, so I decided I should ‘just get on with it’.
I am very much a visual learner, and understand and pick things up much quicker when I am shown how to do something than trying to read and follow instructions, and fathom it out. It’s at least partly confidence, and patience (with my own self). However, on several occasions, when on library duty pre-lockdown, one of the ‘knit and natterers’ had asked me to decipher instructions, and I’d spend ages working out how to do something. I was expected to be able to sort it out and I did, even if beforehand I’d not had a clue. So I ‘can’ when I am patient with myself.
One more blockWorking on the last little block
Suddenly realised just as was finishing the last little block that something was wrong. Can you spot it on the ‘one more block’ above? Everything for this project was in the plastic wallet, work, instructions, hoop (taken off each time I stopped working on it), threads; burgundy and ‘goldish’ perlé EXCEPT for the thin gold thread used on the Grasby lockdown challenge #4 last week. It’s a large cone and doesn’t fit in the plastic wallet!
It was so long since I worked on this that I’d forgotten that I was using a strand of perlé AND a strand of gold in the needle! Sandra suggested weaving the gold through rather than undoing them both. It worked, Alex couldn’t pick out which ones I’d done that way, and Sally picked out a different one! Phew!
Last little block After the gold thread was woven through.Gold thread woven through.
Careful cutting was required on the centre block. The scary bit! Especially on this last bigger block, not just to cut around the kloster blocks, but to ONLY cut the short kloster blocks, leaving the four threads between the long five-stitched kloster blocks. Patience and concentration required!
So busy concentrating, I’d almost finished stitching it before I realised I’d not taken any photos.
Only realised I’d not photographed this big centre piece until I’d nearly finished it.
Even with taking the work out of the hoop every time I stopped stitching the impression of it is there. It also looked a bit grubby so a gentle soak before blocking it.
Finished and out of the hoopBlocked and waiting for it to dry.Close-up while it’s still blocked.
The gold frame is found, it had been tidied away. I just need to be patient waiting for it to dry before lacing and framing it. Oh, and to remember to sign it, something I think we should all do with our work, but several times I’ve forgotten to do before it’s gone in the frame.
This title intrigued me when I saw it on Scunthorpe Embroiderers Guild’s programme for last December. What were we going to be doing? All we had to bring was our basic sewing kits, and the above list.
A Christmas bauble (ball), that was decorated with a variety of chain stitches! We were supplied with a set of instructions, including a list of 36 types of chain stitch, a choice of coloured felt for the segments, and beige or white felt for the semi-circles, all put together by Ruth, our chair. Thank you, Ruth.
24 cut out semi-circles
I’d had no idea there were so many chain stitches and variations, some with lovely or fascinating names: butterfly chain, magic chain (chequered chain), rosette chain, spine chain stitch; and some that sound painful, like twisted chain stitch and whipped chain stitch.
Unsurprisingly, I chose a lime green! We had to draw round the segment shape 12 times, and start stitching them using whichever chain stitches we wanted. Some folk were very methodical and organised, and wrote down which stitches they used. Not me, I wasn’t blogging at the time, and can’t even remember which books I’d used to find them in. Sorry. Some of the instructions were so complicated I couldn’t make head or tail of them. I did manage to do twelve different ones by the end of the day, but knew that there was no chance of finishing it before Christmas, so it was filed away.
6 of my segments with different chain stitches.
I used a mixture of green perlé threads, some variegated (which in hindsight don’t work as well as a single colour). Some I stitched down the centre of the segment, and some round the edge.
I think it was seeing the wisteria leaves last week that reminded me of this PHD (project half done). The segments look very like leaves.
Reminds me of the wisteria leaves from last week.
So this week I have stitched it sitting outside in the sunshine, with a couple of stitching friends. However, it was rather blowy at times, and a couple of gusts blew some of our work onto the ground, where it was difficult to see which were real leaves and which were stitched!
I decided to blanket-stitch the ‘leaves’ to the semi-circles; this has recently become my new favourite stitch. The other suggestion for joining them together was running-stitch, which would have been quicker to do, but there’s no rush, plenty of time until Christmas. I’ve done 6 so far, ready for stuffing.
Below is what ‘ball’ looks like finished. It was one of Ruth’s prototypes that she had done to go on each table so we could see what we were aiming at,and she very kindly gave them away at the end of the day. This one is hanging from the light in the lounge, as a reminder to finish mine. Thinking of it as green leaves, now is just the right time to continue with it.
One of Ruth’s finished baubles.Running-stitched together.
PHDpiece with the monthly Alison Larkin group. This is on hold for the duration of the lockdown as I have gone as far as I can until we get the next stage of the pattern. Hopefully my arm will be back in action by then!
There are several reasons for me having unfinished projects including starting something new is usually more exciting / interesting than continuing with an ongoing piece; the design and planning stage often wakes me in the middle of the night with ideas buzzing around my head or come to me in that half awake state in the morning, particularly if waking naturally rather than by the alarm clock / radio, especially if I have seen or done something new that fires up my imagination and creative juices.
This is another reason, I have more ideas than I can possibly execute. This is where a sketchbook / scrapbook / journal comes in useful. Ideas can be scribbled down, whether words or sketches (this tends to help let me get back to sleep, rather than going round in loops and circles with half formed ideas). Sometimes this leads to ‘test pieces’ or samples that were never really meant to be resolved pieces of work but may lead to one or a series at some point in the future.
Others are workshops or classes that I have gone to where I have maybe tried a new technique (with varying degrees of success) that I have then realised is not for me or that I want to take in a different direction having enjoyed the process. A new skill to experiment with in my own way.
Anthea Godfrey Beaded Collar Workshop with Lincoln Embroiderers Guild This is an example of learning a technique, but wanting to put my own slant on it. The original design was just a round collar, but I wanted it to come down at the front as feel this shape will be more flattering on me.
Some are pieces that involve a lot of on-going work, that are not really UFO’s (unfinished objects) more PHD’s (projects half done) that get picked up when the muse or mood takes me. This can be affected by the amount of time available; light – some need good, natural light, especially if choosing or matching subtle changes of colour, or very fine work; waiting for glue, paint or dye to process or dry to be able to go on to the next stage; or for an idea to develop and sometimes to acquire the right materials for the project.
A Silk Shading Workshop with Nicola Hume This needs good light as the variation in tone is very subtle. Also I have ‘borrowed’ the right thread from the plastic wallet and waiting for it to turn up (I have actively looked for it a couple of times, but no joy as yet).
Finishing off is the final hurdle. This is something I have in common with my late father who often had several projects not quite finished. On having a conversation about why he didn’t finish something off before starting a new project I realised it was exactly the same for me! Once he’d worked out (in his head) how to resolve the project, it was done! And on to the next challenge. Our son is the same. Is it learnt behaviour or part of our genetic make up of how our brains work?
Green red cabbage Slow stitch from Alex’s Scunthorpe Library Group
I have been thinking about restarting writing my blog for a while, but haven’t had the time or inclination to get my head around the updated App.
I previously had got so frustrated when I’d spent time writing and inserting photos only for the whole post to disappear. Nothing changes I have just spent 2 hours writing and inserting photos, published, saw something that needed tweaking only to find the whole post gone, except for the title,when I updated. Aaggh. Nothing in drafts or binned! To be fair somethings did seem much better and more intuitive than when I last used it.
I will try again!
I broke my right upper arm on Saturday, no pot, just a sling and the need to immobilise my arm and shoulder for the foreseeable.
So my many plans for this stay at home time that I had last week have mainly been kicked into touch. Finishing some of my UFO’s, starting new projects, things in the house and garden many impossible to do one non dominant handed. So drastic times call for drastic measures.
In pain and short on sleep, I’m finding it difficult to sleep upright in a slightly reclined chair, my concentration is not good. I love to read but can’t stay focused for very long, but found the perfect solution with a friend’s daughter’s blog yesterday. Sally Flint it’s entertaining and informative, shame I’d not looked at it before the library closed. Although I have plenty of books to read here at home. Time will come.
And at silly o’clock this morning when I couldn’t sleep I caught up with Alex’s blog and the post Green Red Cabbage prompted my following comment.
They were all beautiful, using the past tense as they have mainly gone to new homes. So many to choose from, being greedy I wanted them all! But eventually settled on 2, one the green red cabbage, so delicate and not quite my usual green. The other, walnut, a play safe soft brown. I’ve started the green, some really pleasing bits, (see above) with ideas of how to continue, but on hold for the moment as I’ve broken my right arm. When I can get a bit more comfortable I’ll start the walnut one and challenge myself to stitch left handed – it really will be slow stitch.
They were all beautiful, using the past tense as they have mainly gone to new homes. So many to choose from, being greedy I wanted them all! But eventually settled on 2, one the green red cabbage, so delicate and not quite my usual green. The other, walnut, a play safe soft brown. I’ve started the green, some really pleasing bits, with ideas of how to continue, but on hold for the moment as I’ve broken my right arm. When I can get a bit more comfortable I’ll start the walnut one and challenge myself to stitch left handed – it really will be slow stitch.
Reading both of these blogs gave me the impetus to start writing mine again. Most mornings I write to sort my head* and writing left handed is so slow and laboured that it certainly isn’t ‘stream of conscious’. Blog writing is a completely different thing, but something I can do left handed. Fingers crossed it’ll work this time. *Julia Cameron – The Artist’s Way
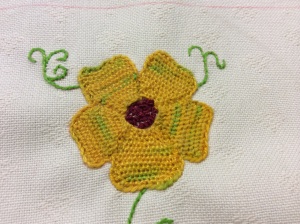
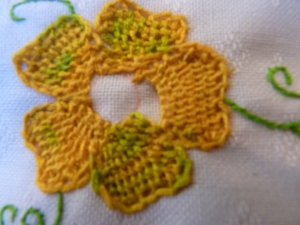
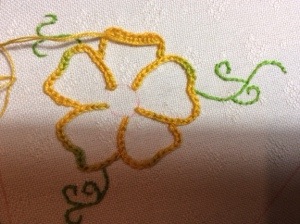
This is another Embroiderer’s Guild project I came across while I was tidying up, (one of many). It’s a scissor-keeper done in detached button-hole stitch. A new stitch to me, and it improved as I grasped it. This is the nearly finished first attempt. I then saw Alex’s and realised how messy mine was, big, uneven stitches. I pulled it all out and started again.
I did more smaller chain stitches round the edge of each petal. This in turn means that there are more detached buttonhole stitches too.
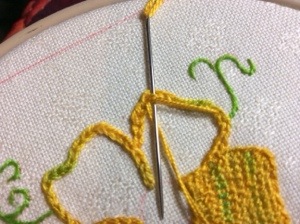
I’m about to start the second petal here. I’m much happier with how it looks. I like the effect of the varigated thread.
I done burgundy french knots for the centre of the flower. I want to put some beads amongst them too. Then it’s almost ready to make up.


 I like the effect of the varigated thread.
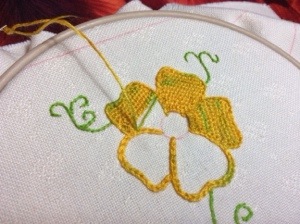 I done burgundy french knots for the centre of the flower. I want to put some beads amongst them too. Then it’s almost ready to make up.