I’ve not done much stitching this week, too many other things to do getting ready for Christmas, but managed some more feather stitching on my Christmas tree from last week’s challenge at Seata. It’s still in the forest and undecorated at the moment!
I’ve enjoyed the stitching, and am just assessing where another branch or two need to go. I can still see a couple of sparse bits before I add the baubles and decorations, some of which I found yesterday when moving things while tidying up.
I just want to wish all my blog followers and readers a Merry Christmas 2023, hope it’s a good one. Thank you all for reading.
Today has been our Christmas meeting at Seata. We had a different format this year, a Sewing Bee type challenge. We knew in advance that we could use the word “Tree”, “Snow”, “Star” or “Gift” to produce a piece of work that didn’t have to be finished, and that would be judged at the end of the day by Alex, our Chair. We could work out our design, even draw it up, but no stitching was to be done in advance.
Predictably I couldn’t make up my mind what to do but, seeing a picture of an embroidered tree on a Christmas card yesterday, it gave me a starting point.
What to use as a background? Having a rummage last night I found a lovely piece of dark green velvet. Perfect. I also wanted some lighter green felt to cut out a triangle to stitch on. No joy, it seems to have disappeared into the black hole with calico and bond-a-web. A beige piece was the best I could find, even after a better look this morning. So the only prepping I had done was to cut a piece of velvet and put masking tape round the edges. A zigzag on the sewing machine would have been better, but no time for that. Then to make a pattern from a folded piece of A4 paper, cutting it from the top fold to the bottom corner, and then cutting a couple of inches off the bottom, and finally cutting a triangle of felt.
I used a green perlé to start feather stitching to a faint blue line of water soluble pen. So far I have only stitched the felt, I’ll attach it to the velvet later. It’s all random, to try and give a more realistic tree. It’s certainly not precise and mirror-imaged.
I added another layer of branches in a variegated knitted thread, and this is how far I’d got by lunch-time.
We had a very nice shared planned “Potluck” lunch. Several of the members find it far too stressful to be potluck, and don’t trust that it will work. I’ve been in several groups over the years where it has always worked beautifully, with a good balance of savoury and sweet. To me, it’s more of a challenge to think what I want to cook / bring so far in advance!
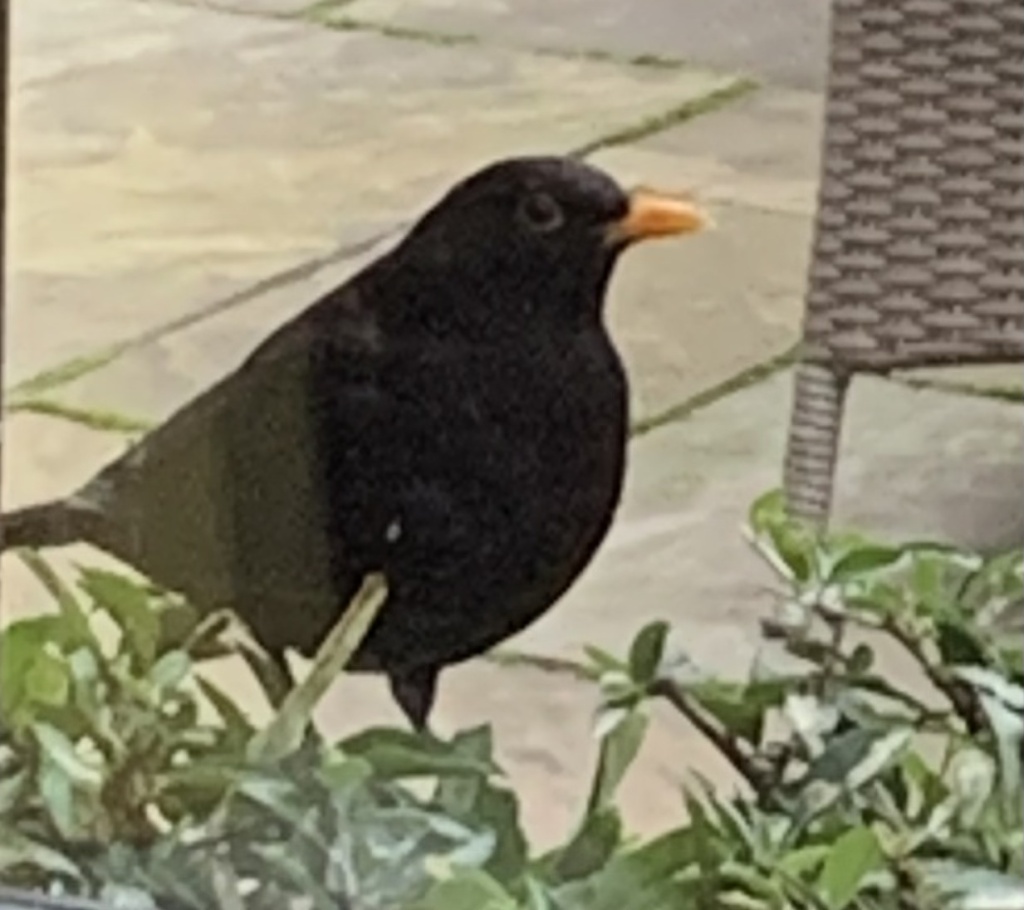
We had all voted during the morning with the usual 5 beads for the Chairs Christmas Challenge, “The Twelve Days of Christmas ” made as a card. The ones who wanted to take part had a lucky dip at a previous meeting. I got four calling (coley – black) birds. I started it several weeks ago, but only finished stitching it this week, attaching it to the card and finishing it off last night!
As my starting-point, I used a photo I took from a friend’s window last December of a blackbird eating cotoneaster berries. After several sketches, looking at books and online to get the legs right, I used a lightbox to prick through the outline on to thin card.
Then I stitched in black thread for the body, some gold for the beak, brown for the legs, a gold jump-ring to outline the eye, and a tiny black sequin for the beady eye.
For the inside, Christmas wishes in the shape of a Christmas tree alternating the letters in red and green……
…….. and the words of part of the chorus on the flap of the card.
After lunch we went back to stitching. I wasn’t sure whether to start decorating with beads and sequins, etc. at this stage, as time was running out rapidly…..
……. or to carry on adding more layers of feather stitch, which I decided was the better option. There was no chance of finishing, and it would be better to finish the fly stitch first. Not the first Christmas project that has taken a while – sometimes years – to finish!
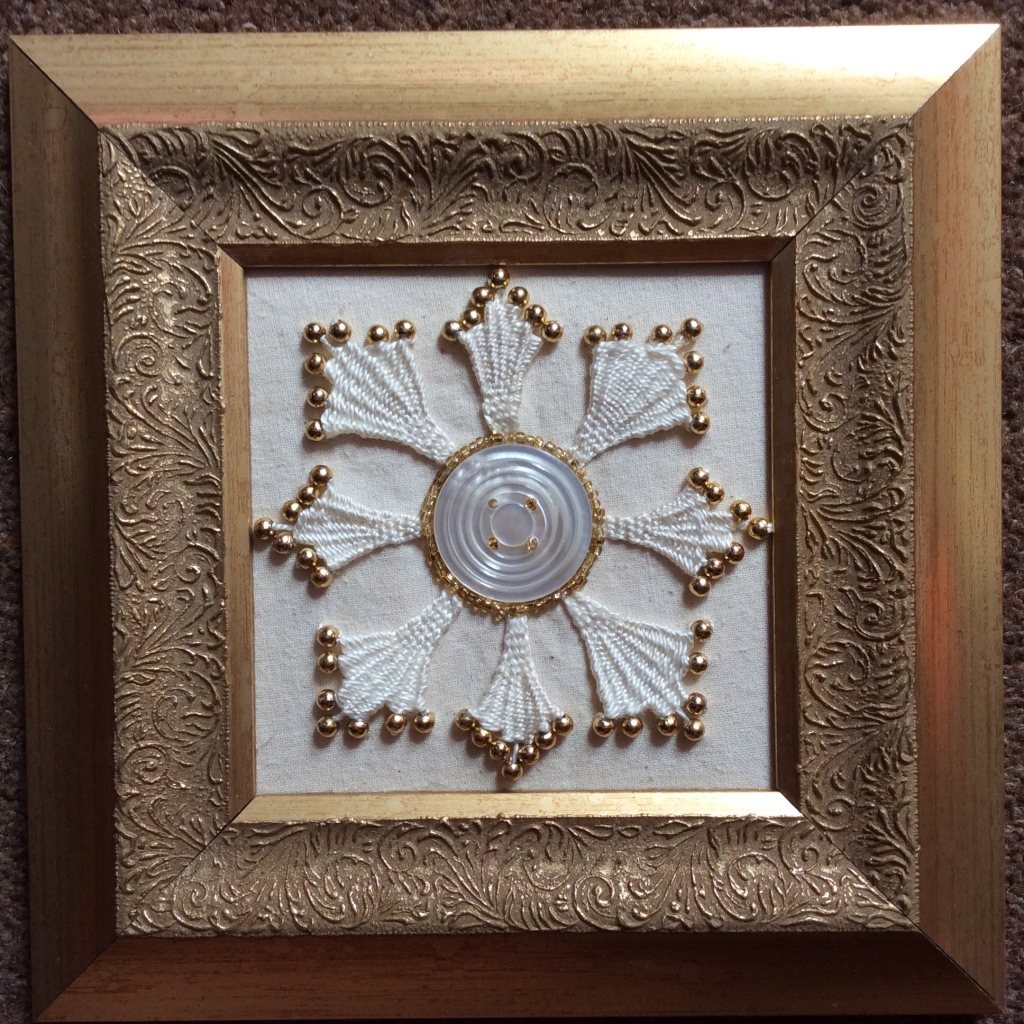
This is the piece of Kamal Kadai that I did with Alex Hall back in 2020, and at Linconshire Textiles today we had a workshop on it with her. Many folk hadn’t heard of Kamal Kadai previously, it’s an Indian technique that is basically needle weaving.
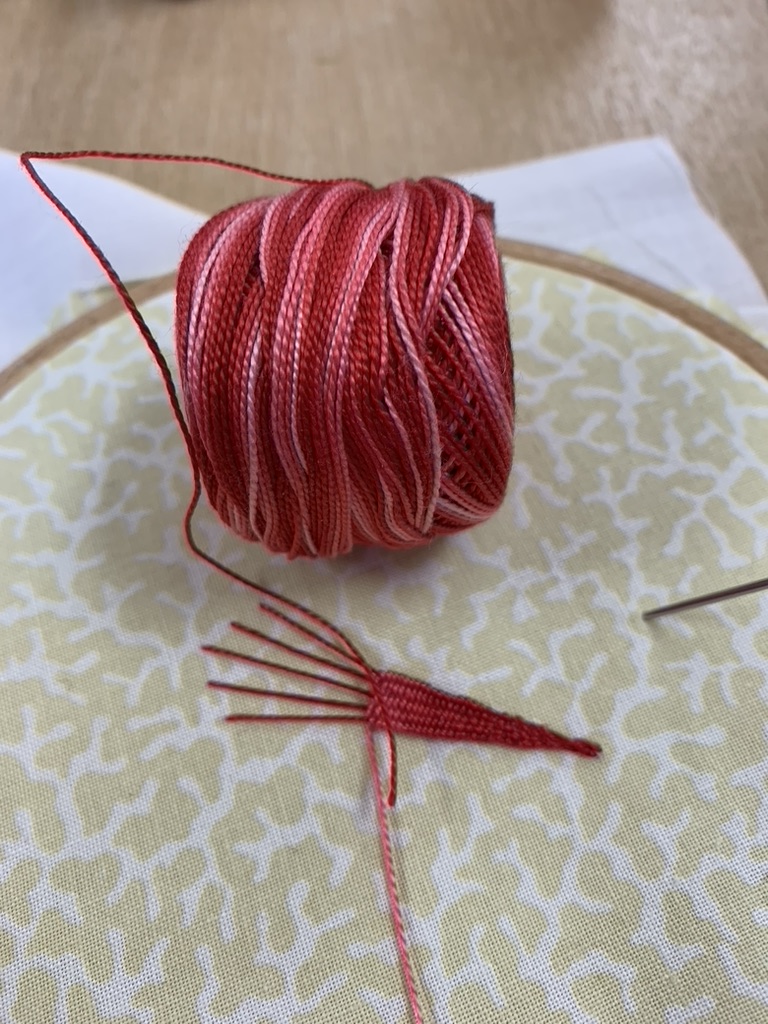
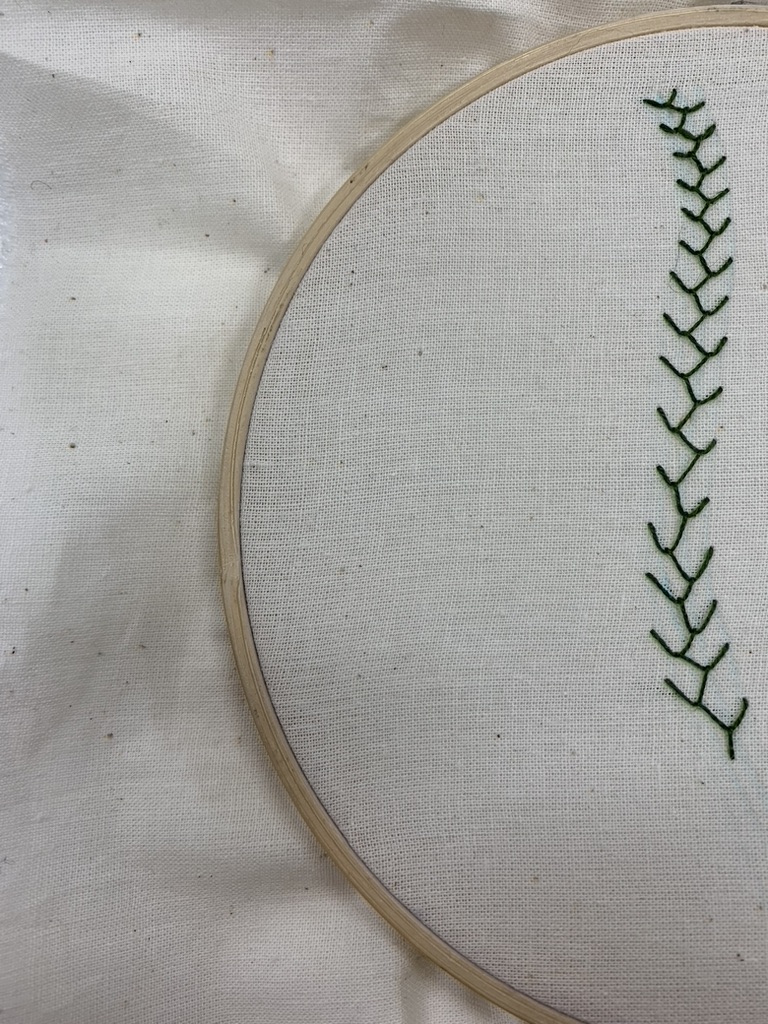
I decided that I would try using it in a slightly different way and not use a button and beads, partly as I didn’t have the right colour or size beads with me. Once my fabric was hooped up tightly, I was ready to start. Several of Alex’s samples used variegated thread, so I decided to try a perlé 8 that I had with me on a creamy yellow cotton little print. I did five fairly long weft threads from a central point, before starting the weaving near the point.
Alex had suggested we had long lengths of thread, as it’s a bit tricky to join in another thread if you run out. It does make it prone to knot or tangle if you’re not careful, but perlé is pretty amenable and I managed to undo the few that slightly knotted. The first one was a bit short!
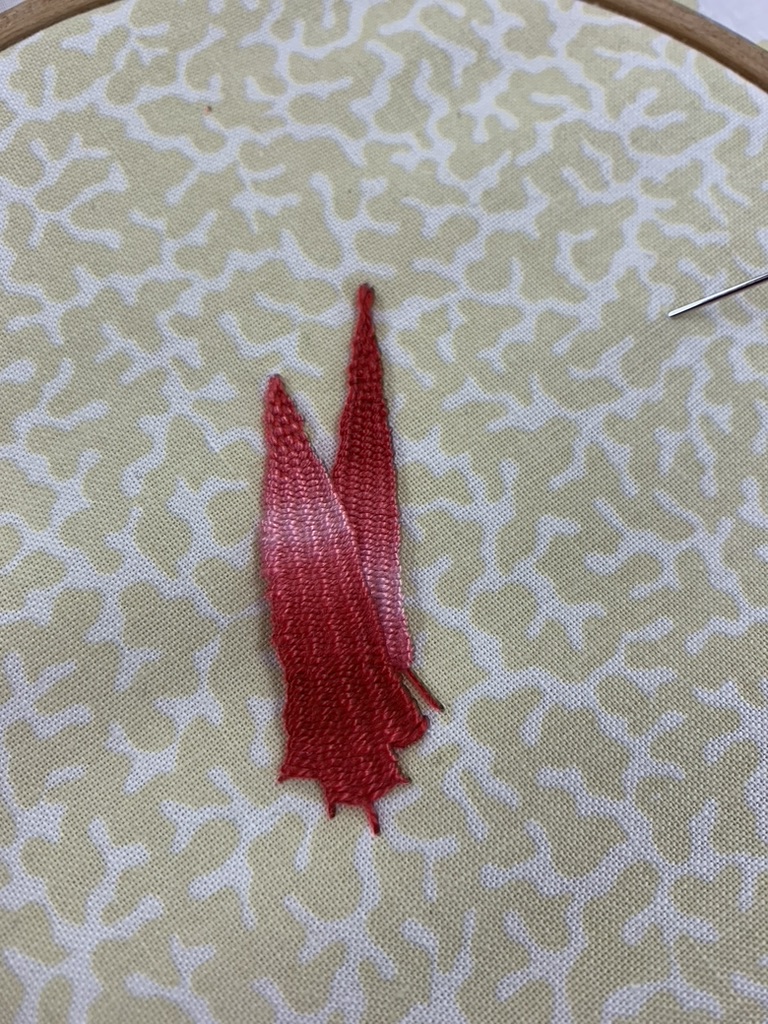
But I was pleased with the variegation. I wasn’t too worried as the next “petal” could / would cover the gap at the bottom.
It very nearly did.
And the next one did, not that you can see it once I started putting in a leaf. The green is a perlé 12, but I only had one length of it in my kit; the big ball was at home. They’re very seasonal colours. This is as far as I’d got by the end of the session, a way to go yet…… another work in progress. Thanks, Alex for a good technique, with some lovely colour combinations around the group in various scales.
The last few weeks at “In the stitch zone” with Alex at Scunthorpe Library we have been working on a Filling Stitch Sampler Project. Alex suggested we use a simple shape for trying out the various stitches.
I decided to use my leaf shape from the first week back in September’s Fun with Feather Stitch Workshop, where I almost immediately went off piste. I did do one row as per instructions, but then wondered what would happen if….
…… I layered my stitches ……
…… more……
….. and more. I added a few stitches at the top to make it more leaf-shaped.
Some more stitches over the whole shape, until I ended up with this…..
…..which I was very pleased with.
The first week of filling stitches was satin stitch, which I’ve done before. So I challenged myself with a slightly textured variegated thread, no idea where it’s come from or what it is.
But I’ve got a much more slubby one, which must have been in the same dye bath, and which I’d wondered about using for the other side of the leaf. That was until Alex pointed out that it was only suitable for couching, which shows how long it is since I last did any satin stitch! The stranded one on the left is probably from the same dye bath, too.
I haven’t finished it yet, but I must before using up the last of the thread on the split stitch sample (week three).
This is also not finished, but I can use another thread on the other side.
On week two we did seed stitch, which I’d not appreciated could be one of several different stitches: french knots, bullions, stab stitch (the only one I’ve used before). I decided to use fly stitch on a scrap of green dyed slubby silk that I have been a bit precious about, in my go-to green perlé. It needs touching with an iron at the top right. Three more weeks to go before I need to decide how to mount them all.
I’ve continued with the abstract Bargello pincushion, mainly in shades of pink, but also made a level edge with mauves and purples at the top (or will it become the bottom?). I had done the longer stitch of pink, following the single stitch row of mauve, before I realised it would make the canvas piece too big for the pre-cut patchwork piece of cotton. I undid the pink, having counted the holes to make it square, but decided the canvas would fold over the three stitches of mauve. I should have counted and set my boundaries before I started with the fun bit, but was too impatient….. more haste, less speed. I did the fuschia pink pattern two stitches wide.
Then I followed that with a double row of yellow, picking up the colour from the variegated thread. Initially I thought it would be too dominant, but it balances out with the rows in the rectangles. For all the yellows I have, it was tricky to find the right shade, but in the end I was happy with the choice.
I continued to fill in the spaces with different shades, textures, matt and shiny threads, totally forgetting to take photos as I worked. I only remembered after I’d put the pale backing fabric behind the canvas (see Abstract Bargello), and machine stitched round following the edge of the canvas stitches, then the darker one for the real back leaving a gap to turn through and trimmed the corners.
I decided not to make the corners really square and left them nicely rounded, which somehow made it feel more cushiony. The top edge is ready to be ladder stitched once I’ve stuffed it.
Then I considered doing a beaded edging, and even sorted out beads, before I saw coral knot stitch being worked on another pincushion, and decided to do that. I tried a couple of thinner perlé threads then settled on two strands of perlé 5 in a dark purple, which tones with the back perfectly. By the time I’d got all the way round I’d got sore fingers. It was tough pulling it through all the layers, but I’ve learnt a new edging stitch and it’s finished, more than two weeks before I need it!
On Monday morning I was trying to sort out my many projects and only take the current one to Alex’s “In the stitch zone” on Monday afternoon. Threads, etc., that were finished with, were put back in the appropriate places, and I could actually travel light with only one bag, and not need to take the several WIP’s I’d taken the last few weeks when I’d just grabbed a bag as I dashed out of the door.
While eating my lunch, I’d even remembered that I’d left my basic sewing kit pouch upstairs when I’d gone up to use the sewing machine (before getting side-tracked on to something else).
Only to get three-quarters of the way there, I realised that the frame with the Bargello was still sitting on the settee, and I had no other project, fabric or threads with me! It wasn’t worth going home to fetch it, nor time. I knew Alex had some canvas and threads that she’d said we could use, and it was the ideal opportunity to make a start on the pincushion for the Seata birthday party at the end of July, something that I’ve known about for months but couldn’t make up my mind what to do. I’d had lots of ideas, but nothing that had really grabbed.
I picked a pretty variegated perlé thread (above) from Alex’s box, knowing I have a card the same at home. These were not colours I would normally work with, especially on natural coloured canvas, but I didn’t want to use white as it would show through too much. I didn’t want to follow a traditional Bargello pattern but to do an abstract Bargello pattern, so started with a zig and a zag before using up the first length of thread. I then started at the edge and worked down first, deliberately not making it a mirror image, and on the up going “underneath” like in Celtic knotwork.
Then I continued across the canvas.
A change of thread and I followed the bottom line, making two stitches level at the new bottom edge, which changed the angles of the zigs and zags. Then I put some long stitches in the right hand rectangle, before doing a single stitch with the mauve perlé. Once again I got so carried away that I forgot to take photos. Some of this was done at home, once I’d sorted out more threads.
Here are possible threads, but leaning towards the pinks and mauves at the moment.
The bottom row is two stitches wide, the same length.
I started putting in a row of pink at the top, but then realised it would be easier to make it the right size if I were to put in the bottom edge, having already decided on the width determined by the pre-cut quilt square of cotton.
Then I had to choose the piece of fabric for the back.
There were several contenders, but the others were too pink, too pale, too patterned, etc.
It’s coming along nicely, and at least I’m not rushing it at the last minute (at least not all of it).
I have been working away at my “bubbles ” piece over the last few weeks. Having been stitching on the widest middle section, it didn’t seem to be making much progress. It’s only when I looked back at going round in circles and bubbles that I realised how much I’ve actually done, also how much the light has improved and lasted longer in the day over the last few weeks. The colours of my photos now look much more how the piece looks in reality.
I’ve done a mixture of new and familiar stitches with some made-up or improvised ones, continuing to use a range of textures, in a narrow range of colours, as requested. I’ve added some more threads to my original selection.
I’ve used this lovely slubby one …..
……. to couch down the thick section with the thin section.
The chain stitch ring on the left was a stitch new to me, and it works like magic! Two different shades of green perlé threaded into the same needle, a normal chain stitch alternating the colour you wrap round the needle, and pulling through. I really couldn’t see how it could possibly work at all and, if it did, I thought the threads would knot or tangle as I pulled the needle through. No, it really worked easily and magically. I want to try it with more threads in my needle. And as you can see from the tacking lines I have nearly got down to the point.
I was pleased with these random long stitches across the ring so much….
….. that I did a smaller denser one.
Simple lazy daisy stitches ……
….look quite different when they are done much larger, and are arranged to look flower-shaped.
I’ve done some more french knots to use up the ends of some of the threads in my needle, and a whole bubble of french knots (see back at the top of the post). This is how much I’ve done so far. I can see other uses for some of the stitches, and better ways to use some – it’s sort of become like a big sampler. I’m still being patient and not putting on the sequins……. nearly there.
I am part of the Grasby Embroiderers group, and we have been working on a new body of work with a difference. Normally, as you would no doubt expect with embroidery, it has been exhibited inside, in a clean, dry environment, but most of this work is outside and exposed to the elements, at Mill Farm Garden, between Brigg and Caistor. In the middle of the week we went to hang the finished work ready for the opening tomorrow.
Helen Boothman, who owns the garden, was excited and intrigued by the idea, and after an initial consultation we went as a group last summer to look round the beautiful, large garden (3 acres!) for inspiration, seeking possible sites to hang the work, with cameras and sketch / note books to gather ideas.
We all came away with our own ideas for individual work, but we also wanted to do a group piece, which we discussed at our next meeting.
I didn’t know quite what I wanted to do for my own piece, but knew where I wanted to hang it! This diamond-shaped peephole into the slatted wooden stucture had caught my attention when Colin and I had visited the garden with Winterton Gardening Club a few years ago. It suggested stained glass to me, using transparent and translucent fabrics.
Once we had had time to mull things over and develop some ideas, we had a second visit as a group, by which time I was thinking sunflower and took some organza to try out. Even with several layers it wasn’t right, so that was put on the back burner while I got on with my leaf for the group piece.
The ferns in our garden were beautiful last year, so I decided to do a machine embroidered fern. My very scribbly quick sketch was about 50 cm high …..
…… some more scribbles…..
……. a test piece on paper …….
……. more tests on dissolvable mediums, layers and layers of zig zag stitch on the sewing machine, hand stitching and more machine stitching of wire, a few broken needles and it became the middle back leaf on the group piece (in situ). All the leaves are different techniques and Mary’s flower is Tyvek.
The sunflower idea had developed over the time it took me to do the leaf.
I had intended to use these agate beads for the centre.
I tried them out in a bracelet, right size, but it was too flimsy to take the weight.
I tried them out within a very large, sturdy earring.
I layered lots of different fine translucent and slightly opaque fabrics together in a hoop. One of the very large earrings was stitched down in the middle, and a hole cut nearly up to it. The extra bits were stitched over the earing, then double petals cut out to go front and back, running stitched through all the layers. The whole flower has several layers of diluted PVA on both sides and then cut out…..
…… but I decided to leave the centre open, so that you can still peep into the wooden building
There are two diamond-shaped “windows”, so I made another sunflower in a different fabric.
The petal outlines are couched down with perlé thread. (These are samples that go with my artist statement.)
This second sunflower does have agates in the middle, but isn’t attached to a backing fabric so the light comes through the gaps between them; the outline of the centre is a twisted cord.
The plants will grow over the next few weeks
The peephole works, as demonstrated by Lorna!
These are a tiny taste of the work and of the lovely garden which is open over the summer every Thursday, Sunday and Bank Holiday from 11am to 4pm. It’s £5 admission to the garden, including the Exhibition.
We just hope that the weather is kind to the work and to the garden!
Last week at SEATA we had a last minute change of plan due to illness, so in the morning we had a “Move it on” session. I took my piece of felt from last week, had a few thinking-out-loud conversations as I was telling folk about it, and ideas came from several people, some of which are possibilities. The felt is fairly thick, so I’ve come to the conclusion that a raglan sleeve or a saddle shoulder would be best and more flattering. Fabric may also be used either for the sleeves and/or down the sides. I need to have a rummage through my stash. Once I could make no more progress on the project, I moved on to other things in hand.
First it was some cushion stitch on canvas that we started with Alex at “In the stitch zone” much earlier in the year. Predictably I immediately went off-piste with mine. The cushion stitch was in my comfort zone, as was the idea to use different size “cushions” and a variety of textures and weights for the threads, which I had also done. How could I push myself a little?
Colour? Combinations of colour? Yes, but a bit of a cheat really. I used the beautiful variegated plait of thread at the bottom left of the first photo, which I used to do a diagonal row of “cushions” starting bottom left and finishing top right. I then used these colours to work out from the diagonal row. This is where I left off months ago.
It was a nice easy piece to pick up and continue with. Assessing it afresh, I realised that the size of the “cushions” didn’t vary very much, and the original variegated thread had got “lost”. The first thing to do was to start to remedy both. Then I filled in the gaps on the left with another slightly variegated thread, which I think worked. Often, using more than one becomes overkill and they fight for attention.
With carefully not starting at the end of the thread, I managed to make the colours more or less match up on the large “cushion”. Then, to fill in the rest of the gaps. It needed more of the yellowy tones but not more fluffy texture, and the only other right tone I had with me was another slightly variegated heavy perlé, fortunately very subtle. And just to rebel a little more, I did a few rectangles, cushions don’t have to be square!
Various deadlines are looming, so I have been trying to “move” some of them on too.
We have angels to finish for the next SEATA meeting for the Scunthorpe Festival of Christmas Trees. Ruth had masses of stuff for us to use last month, and although I am trying to use my stash I couldn’t resist these black “wings”.
Janet H did a session on angel-making a few weeks ago at the Allsorts group. I’d picked a sparkly fuchsia pink felt (not what I’d intended to use), but I had my own bag of suitable bits, including the pink I’ve used for the arms and legs. I’d got beads for the hands, but wanted pink bells for the shoes. I’ve not managed to find them, but found these silver beads when looking for something else. I really wanted some wild fuchsia pink hair, but this fluffy pale pink fell out of the drawer when I was looking for it. It’s still wild.
So, she’s moved on too. I think the eyes need darkening, the face needs some attention, and then I need to attach the wings and (very subversive) a black bead halo that was actually suggested by a vicar’s wife!
I’ve been “searching” for a bed for a friend who is coming to stay for the weekend, a task not as drastic as it sounds. It is just that apart from our son and his wife nobody has come to stay since before lockdown in March 2020. Not being the tidiest of folk, the bed has got piled up with my sewing and craft materials that I am sorting out and re-organising. I have been chipping away at it in short bursts, in between the garden, other jobs in the house, sewing, painting, learning the piano, long walks, etc., etc.
If I do too much in a stint I find that I get over-whelmed by it all, and become not very productive about it, nor does it take much for something more intersting to distract me. It’s almost got to the stage where I need to put things out of sight, out of mind, but I’m resisting that as long as possible. At least if I can still see it, I’ll come back to it after the weekend and continue with the progress.
It is a positive experience in the main. I’m finding things I had forgotten about, or things I couldn’t find when I wanted them, which is most frustrating, even things like calico and bond-a-web that disappear into a black hole. I am grouping things together, beads and threads that were previously in more than one place are now being kept together. It’s a bit scary how much thread I have, I’m going to have to live a very long time to use it all!
It’s also inspiring to see different combinations of things and how they work together. I came across another wooden chocolate box, but I don’t remember the chocolates (!). Maybe I was just given the empty box, but I do remember the perlé threads inside, I’d even looked for it to add more colours to it. They were ones I bought to make my final piece colour spinner in 2011, that I made when doing a module on colour while doing my art Degree.
This is a close-up of the centre of that, as it was a work in progress. It was inspired by the cardboard ones we all made as children, which I played with using a clear perspex CD and Sylco threads in the colours grading from the three primaries of red, yellow and blue into the secondaries orange, green and purple, gradually grading through until I had a colour wheel of 24 colours. This got scaled up to the finished piece which was 2 metres high, hanging from a hook in the ceiling, with the centre wheel of perspex 60cm across.
Another wooden chocolate box, that I have now put where it can be seen on the bedside cabinet, was certainly an empty box that I was given. It was a beautifully made circular box but had no lid. I made the lid many, many years ago in an Adult Education class. I used the salt method for painting a piece of silk, added a few stitches to it with wadding underneath, to make into a lid. Another piece of silk was painted in the same colours, used to make bias binding to wrap over an inner hoop of an embroidery hoop and stretched over a piece of mount board to cover the inside of the lid.
It was all stitched together with ladderstitch and a circular needle. Looking at it now I can see lots of faults: the lid lining looks as if it should have been a bit bigger to cover where the paint didn’t quite cover all the fabric on the inside, but having just measured it, it wouldn’t have sat inside the thickness of the box. The top piece of fabric needed the painting to go further, fine on the outside but not on the inside. But I guess the painting was done before knowing it was going to make a lid for the box. And the gathering should have been pulled tighter to give a neater finish. What it does show is how much my work as moved on, and my skills improved in the twenty plus years since I did it.
What hasn’t changed so much is my colour palette. These beautiful double tulips from another friend’s birthday cake (not made by me) are sitting on my kitchen table at the moment. I washed the buttercream off them, and saved them from the compost bin. We had a lovely communal lunch yesterday, in the middle of stitching round our kitchen table. It was questioned couldn’t we have another birthday next month, but five into twelve months would just mean we age even faster! We’ll just have to find something else to celebrate.